Wet Basement Walls
Causes, Fixes & When to Worry
Six types of wet walls. Six different fixes. Costs from $0 to $15,000. Start with the foil test.
The Basement Guide
Updated Mar 2026 · 22 min read
Wet basement walls are a symptom of one or more distinct moisture problems, each with a different cause, fix, and cost: condensation forming on cool wall surfaces from humid indoor air, water seeping through cracks under hydrostatic pressure, groundwater entering at the cove joint where wall meets footing, vapor diffusing slowly through porous concrete, or surface water from poor exterior drainage reaching the foundation. Diagnosing which problem you have before spending money is the most important step, because the correct fix for condensation (a dehumidifier) is completely different from the correct fix for cove joint seepage (an interior drainage system), and applying the wrong solution wastes both time and money. The foil test described in this guide takes two minutes to set up and reliably distinguishes between moisture coming through the wall from outside and moisture condensing on the wall surface from inside, which is the single most important diagnostic distinction in basement moisture management. Treatment costs range from free (extending a downspout) to $15,000 (exterior waterproofing excavation), making accurate diagnosis the highest-value action a homeowner can take before contacting a contractor.
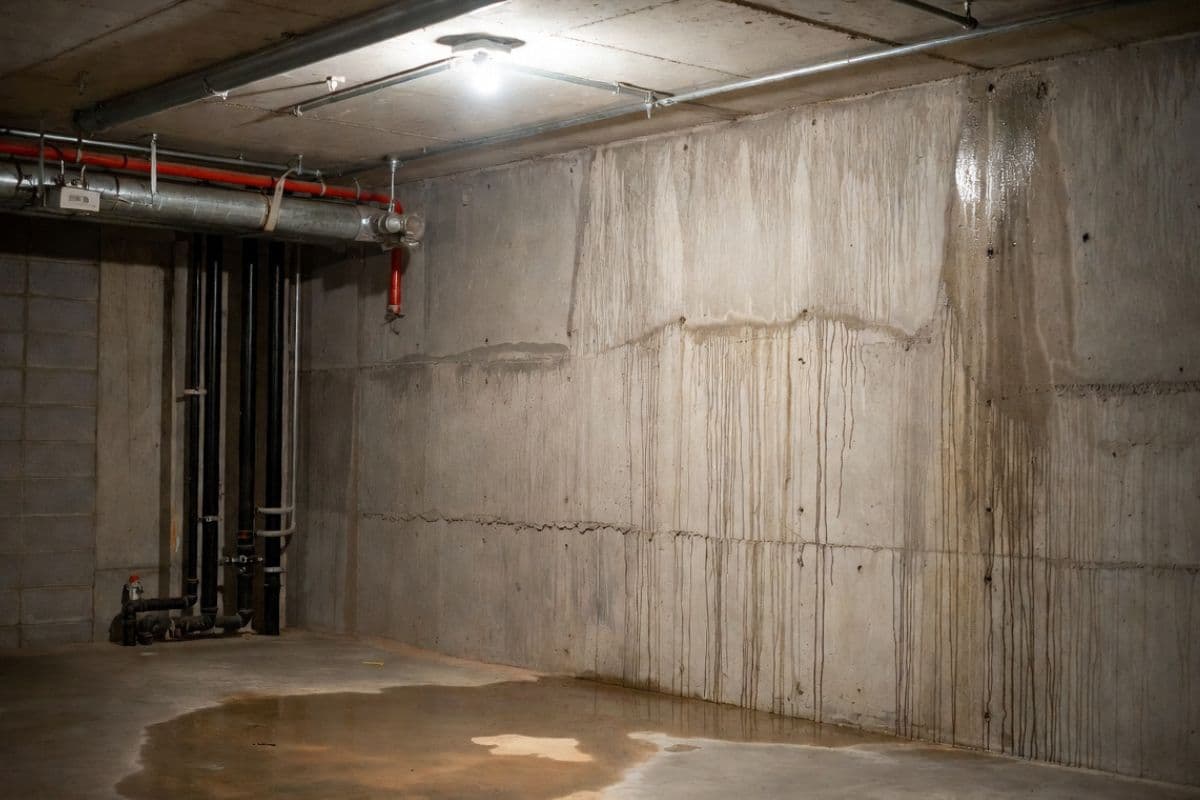
Wet basement walls are not all the same problem. Water streaming through a crack during a rainstorm is a different issue than a wall that feels damp to the touch year-round, and both are different from white, crusty deposits appearing on the surface. Each has a different cause, a different fix, and a different price tag.
The guides that treat them all the same lead homeowners to either overpay for a problem they could fix themselves or underpay for a band-aid that fails in six months. This guide walks through every type of wet basement wall, how to diagnose which one you have, what each fix actually costs, and when you need a professional versus when you can handle it yourself.
If your basement has standing water on the floor rather than wet walls, see our guide on water coming up through the basement floor. If the smell is the main problem, see our sewage smell guide or musty smell guide.
The Foil Test: Is It Seepage or Condensation?
Before doing anything else, figure out whether the moisture is coming through the wall from outside or forming on the surface from humid indoor air. This determines everything.
How to do it:
Tape a 12-inch square of aluminum foil flat against the wet area of the wall. Press the edges tight so no air gets behind it. Leave it for 24 to 48 hours, then remove it.
Outside of foil is wet
You have condensation. Humid indoor air is meeting the cool wall. Dehumidifier, not waterproofing.
Inside of foil is wet
You have seepage. Water is moving through the wall from the soil side. Waterproofing needed.
Both sides are wet
You have both problems. Fix the seepage first, then address the humidity.
This test takes two minutes to set up and saves you from spending $5,000 on waterproofing when you needed a $300 dehumidifier.
Types of Wet Basement Walls and What Each One Means
| What You See | What It Means | Severity | Likely Fix |
|---|---|---|---|
| Uniform dampness across entire wall | Condensation or vapor diffusion through porous concrete | Low to moderate | Dehumidifier, ventilation, vapor barrier |
| Water seeping through a visible crack | Hydrostatic pressure forcing water through a structural crack | Moderate to high | Crack injection DIY or pro; address drainage |
| Water entering where wall meets floor | Hydrostatic pressure at the footing — #1 most common leak location | Moderate to high | Interior French drain + sump pump |
| White powdery deposits (efflorescence) | Mineral salts left as water passes through and evaporates | Low (cosmetic) | Clean deposits, address moisture source, seal wall |
| Wet streaks from window wells | Window well drainage failure | Moderate | Clean drain, add gravel, install cover |
| Damp patches only after rain | Surface water not draining away from foundation | Moderate | Fix grading, extend downspouts |
| Wall is wet AND bowing inward | Hydrostatic pressure causing structural failure | HIGH — URGENT | Structural repair first, waterproofing second |
If your wall is both wet AND bowing, that is a structural emergency.
See our guide on bowing basement walls before addressing the water. The structural problem must be stabilized first.
6 Causes of Wet Basement Walls (and How to Fix Each One)
Condensation
Fix: $200–$500Condensation is the most misdiagnosed basement wall problem. Homeowners see wet walls and assume water is coming through the concrete. In many cases — especially in summer — the moisture is forming on the surface because warm, humid air from the house meets the naturally cool basement walls (typically 55–60°F year-round).
Clues it is condensation:
- Walls are uniformly damp, not just in one spot
- Moisture is worse in summer than winter
- The foil test shows water on the room-facing side
- Cold water pipes in the basement are also sweating
- You can see or feel humidity in the air
How to fix it:
Step 1 — Run a dehumidifier. A basement dehumidifier rated for your square footage is the primary fix. Set it to maintain 30–50% relative humidity. For a full rundown on sizing and models, see our best basement dehumidifiers guide. Cost: $200–$400 for a quality unit.
Step 2 — Improve air circulation. Stagnant air makes condensation worse. A simple box fan or HVAC air circulation keeps air moving and reduces the temperature differential that causes condensation.
Step 3 — Insulate cold surfaces. Wrapping cold water pipes with foam insulation eliminates pipe sweating. Insulating basement walls with rigid foam or spray foam reduces the temperature differential. See our basement insulation guide for material options and costs.
Step 4 — Check your dryer vent. A clothes dryer vented into the basement instead of to the outside pumps massive amounts of moisture into the air. This single issue causes more basement condensation problems than most homeowners realize. Make sure the dryer vent exits the building completely.
Cost: $200–$500 for a dehumidifier and pipe insulation. $1,000–$3,000 if adding wall insulation.
Water Seeping Through Wall Cracks
Fix: $20–$600Concrete cracks. Every poured concrete wall develops cracks over time as the concrete cures, the house settles, and soil pressure shifts. Most cracks are cosmetic. But when a crack goes all the way through the wall, water under pressure from the soil side pushes through and enters your basement.
Clues it is crack seepage:
- Water appears at a specific crack, not uniformly across the wall
- Worse during and immediately after rain
- The crack may be vertical (most common in poured walls), horizontal (structural concern), or stair-step pattern (block walls)
- You can see the water actively flowing during heavy rain
For hairline to moderate cracks (<1/4 inch) in poured concrete walls: Polyurethane or epoxy crack injection seals the crack from inside. The material is injected under pressure and fills the entire crack through the wall thickness. DIY kits cost $20–$60 per crack. Professional injection costs $300–$600 per crack and includes a warranty. This is a permanent fix for non-structural cracks.
For cracks in block walls: Block walls are harder to inject because the crack pattern follows mortar joints. Exterior waterproofing membrane or an interior drainage system is typically more effective than injection for block wall leaks.
For horizontal cracks or cracks with wall displacement: These indicate structural movement from soil pressure. The crack is a symptom, not the cause. See our guide on types of foundation cracks to determine severity, and our foundation crack repair cost guide for pricing.
Cost: $20–$60 DIY per crack. $300–$600 professional per crack. $1,000–$5,000 if structural repair is needed.
Cove Joint Seepage: Where Wall Meets Floor
Fix: $3,000–$10,000The cove joint is where the basement wall sits on the footing. In poured concrete basements, the wall and footing are separate pours, creating a natural cold joint that is not watertight. This is the single most common location for basement water entry. When the soil around the foundation becomes saturated, hydrostatic pressure pushes water through this joint.
Clues it is cove joint seepage:
- Water appears along the base of the wall, sometimes the entire perimeter
- Worse during or after heavy rain or snowmelt
- No visible crack above the waterline
- Water may pool along the wall-floor junction
Cove joint seepage cannot be fixed by sealing the joint from inside with caulk or hydraulic cement. The water pressure will push through any surface-applied patch. The correct fix is an interior perimeter French drain system that intercepts the water before it reaches the floor and channels it to a sump pump.
An interior French drain involves cutting a narrow trench along the inside perimeter of the basement floor, installing perforated drain pipe in gravel, and covering it with new concrete. Water that enters at the cove joint drops into the drain and flows to the sump pit. The sump pump discharges it outside and away from the house.
Cost: $3,000–$10,000 depending on linear footage. See our French drain cost guide and basement waterproofing cost guide for detailed pricing. This is a professional job.
Efflorescence: White Deposits on Walls
Fix: $5–$20 (cleaning)Efflorescence is the white, powdery, or crystalline deposit that appears on concrete and masonry walls. It is not mold. It is mineral salt — primarily calcium carbonate — left behind when water passes through the concrete, dissolves the calcium, and evaporates on the surface.
What it means:
Efflorescence itself is cosmetic and harmless. But it is proof that water is moving through your wall. Where there is efflorescence, there is moisture — even if the wall does not feel wet to the touch.
Clean the deposits with a stiff brush and a solution of white vinegar and water (1:1 ratio). For heavy deposits, a muriatic acid wash (follow safety precautions) removes them completely. Then address the underlying moisture source using the diagnostic approach in this guide. For a deeper dive, see our basement efflorescence guide.
Cost: $5–$20 for cleaning supplies. The underlying moisture fix varies by cause.
Poor Exterior Drainage
Fix: $10–$1,500Sometimes, wet walls are not a basement problem at all. They are a grading, gutter, and downspout problem. Water is being delivered directly to your foundation wall from the surface, and gravity does the rest.
Clues it is a drainage problem:
- Walls get wet only after rain, not during dry periods
- The wet areas correspond to where downspouts discharge near the foundation
- The soil around the foundation slopes toward the house instead of away
- Gutters are clogged, overflowing, or missing
- Window wells fill with water during storms
Extend downspouts. Discharge water at least 4–6 feet from the foundation. Underground extensions with pop-up emitters are the cleanest solution. Cost: $10–$30 per downspout DIY or $150–$300 per downspout professionally installed with underground pipe.
Fix the grading. The soil around your foundation should slope away from the house at a minimum of 1 inch per foot for the first 6 feet. Add topsoil and regrade if needed. Cost: $500–$1,500 for professional regrading around the full perimeter.
Clean and repair gutters. Overflowing gutters dump water directly against the foundation wall. Clean them twice a year (spring and fall) and repair any leaking joints. Cost: $100–$250 for professional gutter cleaning.
Install window well covers and drains. If window wells fill with water, add 6–12 inches of clean gravel at the bottom for drainage and install a clear plastic cover on top to keep rain out. Cost: $20–$50 per window well.
This is the cheapest category of fixes and should always be addressed first.
Many homeowners spend $5,000 on a French drain when $200 in downspout extensions and an afternoon of regrading would have solved the problem.
Vapor Diffusion Through Porous Concrete
Fix: $200–$15,000Concrete is not waterproof. It is porous. Even without cracks, water vapor can slowly migrate through intact concrete walls from the wet soil side to the dry interior side. This is called vapor diffusion, and it produces walls that feel perpetually damp without any visible water flow or specific wet spots.
Clues it is vapor diffusion:
- Walls feel uniformly cool and clammy
- No visible cracks or entry points
- The foil test shows moisture on the wall side
- The problem persists year-round regardless of the weather
- Worse in basements with high water tables
Interior vapor barrier. A heavy-duty 6–20 mil polyethylene vapor barrier attached to the wall surface blocks vapor from entering the living space. The barrier is typically installed with a drainage mat behind it that channels any water that does come through down to the perimeter drain. See our best vapor barriers guide for product recommendations.
Exterior waterproofing membrane. Applied to the outside of the foundation wall during excavation, this is the most permanent solution but also the most expensive ($5,000–$15,000). See our interior vs exterior waterproofing comparison for when each approach makes sense.
Crystalline waterproofing. A penetrating treatment that reacts with moisture inside the concrete to form crystals that block the pores. Effective for vapor diffusion but not for active water flow. See our crystalline waterproofing guide for details.
Cost: $500–$2,000 for interior vapor barrier. $5,000–$15,000 for exterior membrane. $200–$500 for crystalline treatment DIY.
When to Worry: Warning Signs That Need Professional Help
Most wet basement walls are manageable. But some situations require immediate professional assessment.
| Warning Sign | What It Means | Urgency |
|---|---|---|
| Wall is bowing, leaning, or tilting inward | Structural failure from soil pressure. Water is a symptom, not the primary problem. | Immediate. Call a structural engineer. |
| Horizontal crack across the middle of the wall | Soil pressure exceeding wall capacity. | Immediate. See our bowing walls guide. |
| Stair-step cracks in block walls widening over time | Progressive structural movement. | Soon. Get a professional evaluation. |
| Active water flowing through the wall during rain | Significant hydrostatic pressure. Interior drainage system likely needed. | Soon. Will not improve on its own. |
| Sewage or foul odor accompanying the water | Sewer line damage or septic system failure. | Soon. Health hazard. Call a plumber. |
| Mold growth visible on walls | Moisture has persisted long enough for mold to colonize. | Moderate. Address moisture source, then remediate mold. See our mold prevention guide. |
DIY vs. Professional: Which Fixes Can You Handle?
| Fix | DIY? | Cost DIY | Cost Pro |
|---|---|---|---|
| Extend downspouts | Yes | $10–$30 each | $150–$300 each |
| Clean gutters | Yes | Free (your time) | $100–$250 |
| Regrade soil around foundation | Yes (if minor) | $50–$200 in topsoil | $500–$1,500 |
| Install dehumidifier | Yes | $200–$400 | N/A |
| Install window well covers | Yes | $20–$50 each | $50–$100 each |
| Clean efflorescence | Yes | $5–$20 | $100–$200 |
| Apply waterproof paint or sealant | Yes | $50–$150 | $300–$600 |
| Inject a wall crack (poured concrete) | Maybe | $20–$60 per crack | $300–$600 per crack |
| Install vapor barrier | Maybe | $200–$500 | $1,000–$3,000 |
| Interior French drain + sump pump | No | N/A | $3,000–$10,000 |
| Exterior waterproofing membrane | No | N/A | $5,000–$15,000 |
| Structural wall repair (anchors, beams, carbon fiber) | No | N/A | $3,000–$15,000 |
For a complete breakdown of when to DIY and when to hire, see our DIY vs hiring a pro guide. For guidance on finding and vetting contractors, see how to hire a basement waterproofing contractor.
Glossary
Hydrostatic Pressure
The force exerted by water in saturated soil against a basement wall and floor slab. Increases with soil saturation depth and proximity to the water table. The primary driver of water entry through cove joints, wall cracks, and porous concrete. Cannot be stopped by surface sealing alone — requires drainage to relieve the pressure before it reaches the wall.
Cove Joint
The junction where the basement wall sits on the footing, formed as a cold joint between two separate concrete pours. Never fully watertight by design. The single most common water entry point in poured concrete basements because hydrostatic pressure channels groundwater upward along this perimeter gap. Cannot be permanently sealed from inside with caulk or hydraulic cement — requires an interior drainage system to intercept water at this point.
Efflorescence
White, powdery, or crystalline mineral deposits on concrete or masonry surfaces caused by water dissolving calcium and other salts inside the concrete and depositing them on the surface as it evaporates. Not mold and not structurally harmful, but reliable evidence that water is actively migrating through the wall. Must be removed mechanically before applying any sealer or paint. See our efflorescence guide.
Vapor Diffusion
The slow migration of water vapor through porous materials like concrete from the high-moisture side (soil) to the low-moisture side (interior), driven by vapor pressure differential rather than liquid water movement. Produces walls that feel uniformly damp without visible cracks or water flow. Addressed with penetrating sealers, crystalline waterproofing, or a vapor barrier with drainage mat rather than crack injection or a French drain.
French Drain (Interior)
A perforated drain pipe installed in a gravel-filled trench cut along the interior perimeter of the basement floor. Intercepts water entering at the cove joint and through the lower wall before it reaches the living space, channeling it to a sump pump pit. The standard professional solution for persistent cove joint seepage and high water table conditions. Costs $3,000 to $10,000 for a full perimeter installation. See our French drain cost guide.
Vapor Barrier
A polyethylene sheet, typically 6 to 20 mil thickness, attached to basement walls to block water vapor from reaching interior surfaces and building materials. Often installed with a drainage mat behind it that channels any water coming through the wall downward to the perimeter drain rather than letting it wet the wall surface. See our best vapor barriers guide.
Hydraulic Cement
A fast-setting cement compound that expands slightly as it cures, used to plug active drips and small holes in concrete walls. Effective for stopping visible water flow at a specific point as a temporary measure. Not a long-term solution for structural cracks, persistent hydrostatic pressure, or cove joint seepage, as the pressure will eventually find another path or push the patch out.
Crack Injection
A professional repair method where two-part polyurethane foam or epoxy resin is injected into a wall crack under low pressure through a series of ports set at intervals along the crack. Fills the crack through the full thickness of the wall, blocking water infiltration. Epoxy restores structural strength and requires a dry surface. Polyurethane foam expands to fill irregular voids and works on wet or actively seeping cracks. The standard repair for non-structural cracks in poured concrete walls. See our foundation crack repair cost guide.
Frequently Asked Questions
What is the foil test and how do I do it?
The foil test is a simple diagnostic that determines whether basement wall moisture is coming through the wall from outside (seepage) or forming on the wall surface from humid indoor air (condensation). Tape a 12-inch square of aluminum foil flat against the wet area of the wall, pressing all edges tight so no air can get behind it, and leave it for 24 to 48 hours. If the outside face of the foil (room side) is wet when you remove it, the moisture is condensation from indoor air hitting the cool wall surface, and a dehumidifier is the fix. If the inside face (wall side) is wet, water is migrating through the wall from the soil side, and waterproofing is needed. If both sides are wet, you have both problems. This test saves homeowners from spending thousands on waterproofing when a $300 dehumidifier would have solved the problem, and from buying a dehumidifier when they have a genuine water intrusion issue that requires drainage.
Why are my basement walls wet when it has not rained?
Two common causes: condensation (humid indoor air meeting cool walls) and a high water table pushing moisture through the concrete via vapor diffusion. Do the foil test to determine which one. Condensation is solved with a dehumidifier. Vapor diffusion requires a vapor barrier or waterproofing treatment.
Is it normal for basement walls to be damp?
Slight coolness is normal. Visible moisture, water droplets, or wet patches are not. Concrete walls will always feel cooler than the air, but they should not feel wet. Any persistent dampness indicates a moisture source that should be identified and addressed.
Can I just paint over wet basement walls with waterproof paint?
Waterproof paint like DryLok or Kilz Basement can reduce minor vapor diffusion through porous concrete, but it cannot stop active water pressure from cracks, cove joints, or hydrostatic pressure. If water is actively entering your basement, paint will peel off within a year. Fix the water source first, then paint as a secondary barrier. See our waterproof paint and sealers guide.
How much does it cost to fix wet basement walls?
It depends entirely on the cause. Extending downspouts costs $10–$30 each. A dehumidifier costs $200–$400. Crack injection runs $300–$600 per crack. An interior French drain system costs $3,000–$10,000. Exterior waterproofing runs $5,000–$15,000. See our complete waterproofing cost guide for the full breakdown.
Should I buy a house with wet basement walls?
Not necessarily a deal-breaker, but get a professional inspection before closing. The key question is what is causing the moisture and how much will it cost to fix. Condensation or poor drainage (cheap fixes) is very different from structural wall failure or a failed exterior waterproofing system (expensive fixes). Use the inspection findings to negotiate the price or request repairs before closing. See our homebuyers basement inspection checklist.
Will wet basement walls cause mold?
Yes, if the moisture persists. Mold can begin growing on damp surfaces within 24 to 48 hours in warm conditions. Concrete itself does not support mold well, but anything attached to or stored against a wet wall — drywall, wood framing, cardboard boxes, carpet — will grow mold quickly. Address the moisture source promptly and see our mold prevention guide.
Can wet basement walls affect my home's value?
Yes. Visible water damage, staining, efflorescence, and mold are red flags for buyers and home inspectors. Unresolved moisture issues can reduce your home's value by 10 to 25% depending on severity. Conversely, a professionally waterproofed basement with documentation can actually increase value. See our guide on how waterproofing affects home appraisal value.
Do homes on septic systems have different basement moisture issues?
Sometimes. If the septic system's drainfield is located near the house, a saturated or failing drainfield can raise the local water table and increase hydrostatic pressure against basement walls. If your basement moisture coincides with septic system problems like slow drains, yard odor, or soggy ground over the drainfield, the septic system may be contributing to the issue. See The Septic Guide for septic-specific help.
Related Guides
Complete Basement Waterproofing Guide
Everything you need to know about stopping basement leaks for good.
Interior vs. Exterior Waterproofing
Which approach is right for your situation and budget.
Basement Waterproofing Cost
Full pricing breakdown for every type of waterproofing system.
French Drain Cost Guide
Interior and exterior French drain pricing by type and region.
Types of Foundation Cracks
Which cracks are cosmetic and which need immediate attention.
Bowing Basement Walls
Causes, repair methods, and what it costs to fix.
Best Basement Dehumidifiers
Top-rated models sized for every basement.
How to Prevent Basement Mold
Stop mold before it starts with these proven strategies.
Basement Efflorescence Guide
What the white powder means and how to get rid of it.
Waterproofing and Home Value
How basement waterproofing affects your home appraisal.
Get Expert Help With Your Wet Basement Walls
Connect with pre-vetted waterproofing professionals in your area. Free assessments, no obligation.